| Download the Template | Upload the Template |
| Edit the Template | Review Product Errors |
| Create Products with Variations | Categorize & Update New Items |
| Before Uploading the Template |
Download the Template
- To begin the bulk upload process you must first download the file template.
- In Admin, navigate to Inventory > Products and click "Upload".

- Select "Product information" as the upload type and click "Download template".

- Close the pop-up modal.
The default template title will be 'SE Import Custom Products' and will be downloaded to your computer as a .csv file. Please make note of the file location.
Edit the Template
-
Open the file template titled "SE Import Custom Products".
-
The template can be opened and edited in Microsoft Excel, Google Sheets, or Apple Numbers.
-
-
Fill in each column with the appropriate information. *Denotes required fields
-
Brand*- Brand name (ex: Trek).
- If the brand isn't in our library then it will need to be created first.
-
Product Name*- Model name (ex: Domane SLR 9 AXS Gen 4).
-
Product Description- A brief description of the product.
-
Year - Model year (ex: 2023).
-
SKU* - POS SKU or System ID (ex: 210000012345). Any alpha/numeric format will work, as long as there are no duplicates across products in the file or already on the site.
- UPC/GTIN1 - Enter the 12-digit UPC in this field. If the item doesn't have a UPC then leave this field blank, do not make one up.
-
GTIN2 - GTIN2 or EAN if available.
-
MPN - Use actual MPN or create one for store-branded items.
-
Weight (lbs) - The weight of the item after it has been packaged for shipment.
-
Height (in) - The height of the item after it has been packaged for shipment.
-
Length (in) - The length of the item after it has been packaged for shipment.
-
Width (in) - The width of the item after it has been packaged for shipment.
-
Size - Product Size (ex: small, XL, 56cm, etc).
-
Color - Product color (ex: Orange, Purple, etc).
-
Gender* - Use one of the following designations: Not Designated, Men's, Women's, Unisex, Boys, Girls, or Kids.
-
Default Price* - MSRP or default price. Do not include $ in your price
-
Sale Price - If applicable. Do not include $. Adding a sale price does NOT put an item on sale. Click here for information on pricing.
-
Shippable by Air - Enter True if yes or False if No. If left blank, the default is True (Yes).
-
-
- In-Store Pickup - Enter True if yes or False if No. If left blank, the default is True (Yes).
- ORM-D - Enter True if yes or False if No. If left blank, the default is True (Yes).
- Variation 1 Method - Variation type that is not size or color (ex: flavor, wheel Size, etc).
- Variation 1 Value - Variation Value (ex: chocolate, 27.5, etc).
Create Products with Variations
-
- Brand, Model Name and Product Description must be identical to create a single product.
- Enter size and/or color for each variation, if applicable.
- For other variation types (for example Flavor: Chocolate, Vanilla, Strawberry), copy/paste the initial product into a new row (or rows based on the number of variations required) and change the SKU, UPC, GTIN, and variation values.
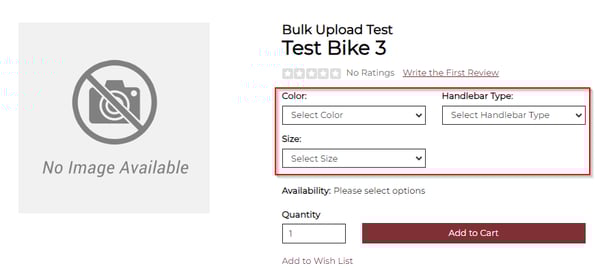
- The following example shows how to enter a bike (Test Bike 3) with three different variation types (Size, Color, and Handlebar Type)and create a single catalog product with multiple variations. (To view a larger version of the image, right-click on the image and click "Open image in new tab".)

The SKU for each variation must be changed and cannot be left blank.
-
-
- Additional variation types may be added to the template by entering them into the columns to the right of the Variation 1 Value. Please take a look at the example below.
-

- Once the template is complete, save the document as a .csv file and note the location where it is saved on your computer.
The template filename can be changed, but the file must be saved as a .csv file before uploading, and the existing column headers must remain intact.
Before Uploading the Template
- A product's Brand and any non- Size/Color Variation Types for new items must exist in Admin before uploading the template.
- If they don't already exist then the brand or variation type must be created/added.
- To add a new Brand:
- Navigate to Settings > Commerce > Brands.
- Click "Add Brand".
- Enter the brand name.
- Click "Save Changes".
- To add a new Variation Type:
- Navigate to Settings > Commerce > Variation Types.
- Enter the new variation type and click "Add It".
Do not delete existing brands or variation types, as it could negatively affect items that are currently in your catalog.
Upload the Template
- In Admin, navigate to Inventory > Products and click "Upload".
- Select "Product Information" as the upload type and click anywhere inside the box where it says "Select file from computer (.csv)".

- Locate the file on your computer and select it.
- Click "Upload and continue".
If the wrong file is selected, click "Reset" to remove the incorrect file and choose a new one.
- Once the file is uploaded successfully an upload summary will appear to indicate the number of items that were created/updated.
- After the file has been successfully uploaded, click "Close".
Review Product Errors
- If you receive an error message in the Upload summary that "X products have errors", those errors will need to be corrected before the file will successfully upload.
- To view the errors, click "Download error report".

- Close the Upload product file pop-up or click "Reset" to restart the upload process.
- Correct all errors in the template and attempt the upload process again.
The error file title will be SE Import Custom Products Errors and will associate errors with the SKU and Product Name.
Categorize & Update New Items
- Newly uploaded items are uncategorized and will also not have Quantity-On-Hand (QOH), Quantity-On-Order (QOO), Sale Start/End Dates, some shipping information, and images so this information must be added.
- To view these items, refresh the browser or navigate to Inventory > Products, and click "Show uncategorized items..." at the top of the page.

- Click the green edit pencil next to each item to update the Category, Quantity-On-Hand (QOH), Quantity-On-Order (QOO), Sale Start/End Dates, Shipping information, and images.

- Click "Save Changes" after updating each product, and publish changes (Website > Publish Changes) after all items have been updated.
The product information upload tool now looks for Library matches to the significant digits at the end of the GTIN column, looking for matches regardless of whether there are leading zeros on one side or the other, and importing products from the Library if it finds one of these matches.