| Create a New Purchase Order | Add a Comment |
| Add Order Information | Receive a Purchase Order |
| Add Products | Print Labels |
| Add Special Orders | View, Search, & Filter |
| Update Status | More Actions |
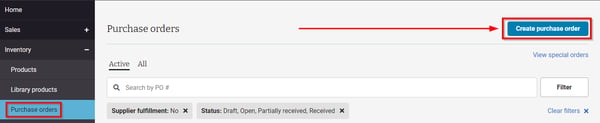
Create a New Purchase Order
- Navigate to Inventory > Purchase Orders and click "Create purchase order".
Add Order Information
-
Select a supplier from the Supplier list and enter your Dealer ID for that supplier (if you have one).
- If the supplier isn't listed, select "Other supplier" at the bottom of the list.
-
Select a Ship to address for the order.
- The Ship to list is populated from your store locations in Store Information.
-
- To enter a different ship to address select "Other address", enter custom shipping information, and click "Save changes".
Add Products
- Use the "Add Product" search bar to find products by product name, brand, SKU, GTIN (UPC), or MPN.

- Select the product from the list and click "Add to order".
- If desired, click the down arrow to view the Product availability dropdown, which will display the location and quantity available at each location.
When a product is added you may see a flag at the top of the order that says "One or more products on this order may not be sold by the supplier you’ve selected." Disregard this if you know that the supplier has the item you've added.
Products generated from a Product Upload CSV are now instantly accessible for inclusion in a Purchase Order.
Add Special Orders
- In the top right corner of the Add Product section, click "Add special order product".

- In the modal, select an item and click "Add to purchase order".

- Only one special order item can be added at a time; they must be added individually.
- The item will then appear in the Product section of the purchase order with a Special order designation that can be expanded to view the associated sale and sale #, Customer, Phone, and Comments.
-
- The Purchase order # will also appear on the Special orders list screen.
Update Status
All purchase orders start in the Draft status.
 Once your purchase order is submitted to the supplier, use the Status dropdown to set the purchase order status to Open.
- Orders may also be marked as Partially received, Received, Done, or Archived.
- After a purchase order is marked as Open, if desired, an Ordered date can be added in the Order information pane.
- The status is displayed at the top of the order, as well as in the Purchase Orders list view.
![]()
Add a Comment
- Scroll to the bottom of the purchase order to leave comments.
- Comments are tied to the user who is logged in, are posted in chronological order, and cannot be edited after they are posted.
- Comments are limited to 200 characters.
Receive a Purchase Order
- Navigate to Inventory > Purchase Orders, find the purchase order you'd like to receive, and click on it.
- Purchase orders can be received all at once if all ordered items arrive together, or item by item if the products arrive at different times.
- To receive all items on the purchase order at once, click "Mark all as received".

- To receive all items on the purchase order at once, click "Mark all as received".
-
-
- The received inventory will be added, and the Status will change to "Received" with today's date.
- To receive the items line by line, locate the item you want to receive and add the received inventory to each line item by clicking the right-pointing arrow.

-
-
-
- The received inventory will be added and the Status will change to "Partially received".
-
-
- To receive items using a barcode scanner, click the barcode icon and scan products one by one.

-
-
- When done, click "Close" to exit scanner mode.
-
- If applicable, once an item is received, click "Add" to enter serial numbers.

Items not yet received will display a white background color, partially received items are yellow, and fully received items will be displayed in green.
- Once all items on the purchase order are received, the status can be changed to "Done" which will remove the purchase order from the default view of the purchase order list.
Print Labels for Products
Products do not need to be received to print a pricing/barcode label.
- Labels can be printed individually or for the entire purchase order in these sizes: 2.25 in (w) x 1.25 in (h), 2.00 in (w) x 1.00 in (h), or 1.25 in (w) x 1.00 in (h).
- To print an individual label, find the product on the purchase order and click the 3 dots for more actions and select "create label".

-
- Select label size, enter the quantity to print, and click "Create label".
- To print labels for all items on the purchase order at once, click the label button to the right of the product search bar.

-
- Confirm the correct label size is selected and click "Create label".
The ordered quantity determines the number of labels printed per product.
View, Search & Filter
- To view a list of all purchase orders, navigate to Inventory > Purchase Orders.

-
- The purchase order list shows all purchase orders (except those excluded), their PO number, Status, Created date, Ordered date, Received date, Supplier, the number of products on the order, and the total cost.
-
- The default purchase order list view doesn't include "Done" or "Archived" purchase orders.
-
- The purchase order list shows all purchase orders (except those excluded), their PO number, Status, Created date, Ordered date, Received date, Supplier, the number of products on the order, and the total cost.
Sort Purchase Orders
- Purchase Orders can be sorted by the Created date (ascending or descending) or by the Total Cost (high to low or low to high).
Search for Purchase Orders
-
Use the "Search by PO #" field to search for purchase orders by their PO number.
- Enter only the numerals; there is no need to enter the PO-prefix.
Filter Purchase Orders
- Click the "Filter" button on the right side of the screen.

- In the slide-out modal, click the down arrow in each section to make the desired selections and click "Done" to apply the filters.
View Special Orders
- To view special orders, click "View special orders" in the Purchase Orders list screen.
More Actions
- From within a purchase order, click "More actions" to view a drop-down menu with options to Email, Download, Print, or Duplicate the purchase order.

- Click the "Email" button to share your purchase order.
- When emailing a purchase order, e.g. to submit it to a supplier, the "To", "From", and "Subject line" fields are all required.
-
- You may also check the Email copy to the sender's email address box to have a copy emailed to you.
Download
- Click the "Download" button to automatically download the purchase order as a CSV file on your computer.
- Click the "Print" button to print or save the purchase order as a PDF.
Duplicate
- Click the "Duplicate" button to create a copy as a new purchase.