| Power & Data Connection | Add Printer |
| Paper Roll Install | Print Test Receipt |
| Driver Install | Troubleshooting |
| Mac Instructions |
Power & Data Connection
- Connect the power adapter to the printer and plug it into a power outlet.
- Connect the USB cable from the printer to an available USB port on your computer or POS system.
- Turn the printer on using the power switch on the side.
Paper Roll Install
- Open the paper cover of the printer.
- Insert the thermal paper roll, ensuring the paper feeds from the bottom of the roll and the leading edge is straight.
- Close the paper cover, leaving a small amount of paper extended from the slot.
Driver Install
- Navigate to https://starmicronics.com/support/receipt-printers/.
- Search for the model TSP100III.
- Download the TSP100 futurePRNT Software Setup EXE File to install only the program.
- Do not choose the Full option
-3.png?width=497&height=167&name=image%20(5)-3.png)
- Find the tsp100_v770_setup.EXE file in your Downloads folder/history and double click on it.
- Follow the installer prompts. Once complete a success message displays
Add Printer
- Plug the USB into your computer, connect the power supply, and turn on the printer. Your computer should detect a new hardware product and automatically install the printer driver.
- You should see a message in the lower right corner of the Windows screen, "Your device is ready to use".

- In Control Panel, select Printers & Scanners. If "Star TSP100" appears, installation is complete.

Print Test Receipt
- In Workstand Admin, navigate to Settings > Hardware and confirm that you have a register with Printer type set to Thermal printer.

- Navigate to Sales > In-store sales and select a sale.
- Make sure that the correct register is selected.

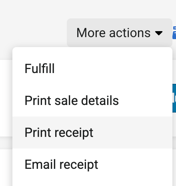
- Click More actions, then Print receipt.
- Under Destination, make sure the newly-installed thermal receipt printer is selected.
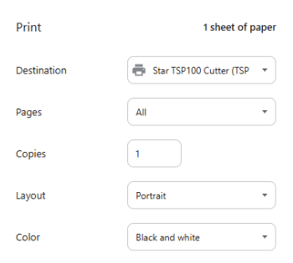
- Confirm Layout is set to Portrait.
- Select More settings.
- Set Paper size to 72 x Receipt.
- Under Options, make sure Headers and footers, Background graphics are deselected.
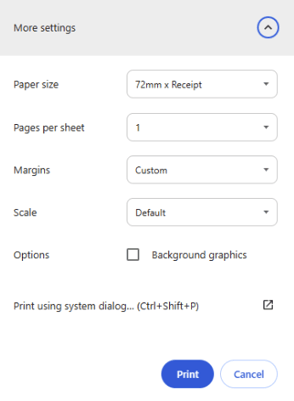
- Click Print.
Troubleshooting
Print preview formatted incorrectly or blank?
- Make sure a register with Printer type set to Thermal printer is selected.
Text cut off?
- Make sure that Scale is set to Default or 100.
- Check that Margins are set to Default.
- Note that adjusting your margins and scale allows you to adjust how the receipt prints.
Store information incorrect?
- Navigate to Settings > Website > Store information.
- Adjust Store Name to change the name that displays at the top of the receipt.
- To adjust address, scroll down to Store Location(s) and use the green pencil icon to edit the address for the desired location.