POS Sync
Get your point of sale system to send your up-to-date inventory every night, and control what items appear on your site from that inventory.
Lightspeed Users Instructions Here
Set Up
- Settings > POS Sync > POS Sync Settings (for non-Lightspeed users)
- Check the box at the top of the screen to Enable POS Sync.
- Select your POS system from the dropdown and Save Changes at the bottom of the page.

- Click Generate a New FTP Password.

- Take the login information you will receive in the POS FTP email and enter it into the Inventory Upload/Export area in your POS.
- For further instructions on how to properly set up your POS system, look here.
Other Settings
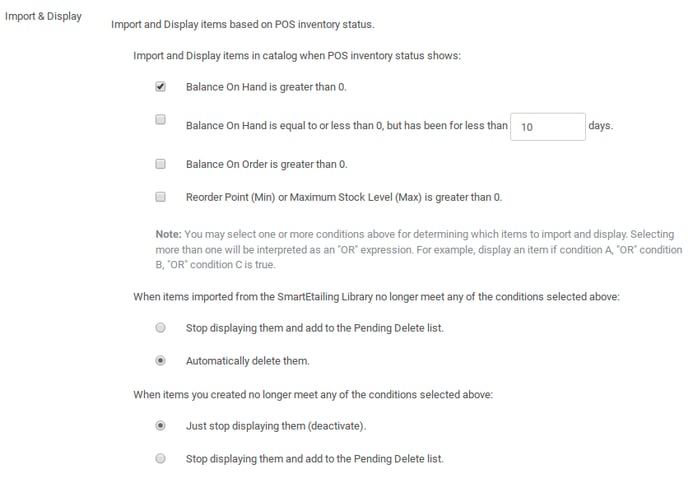
- Import & Display best practices are shown below. If your site is brand new, these are your standard settings. We recommend making your settings match these if they do not already.

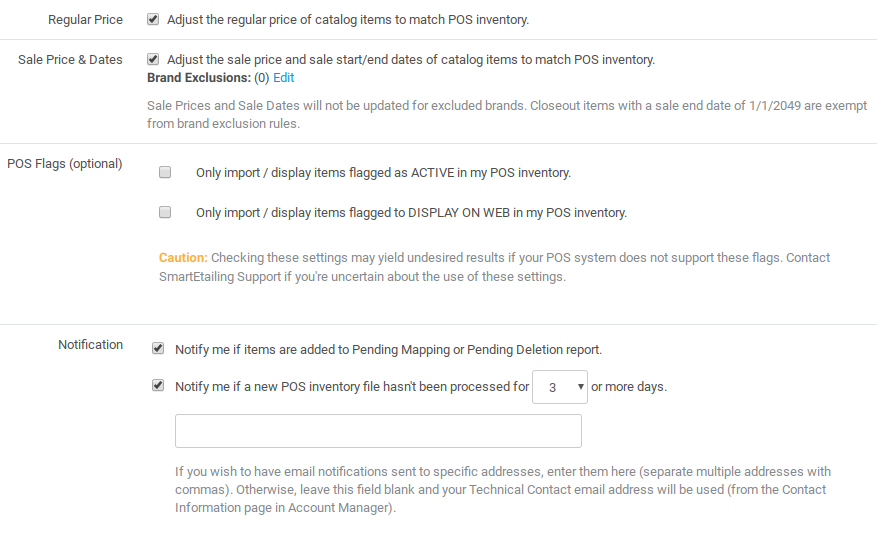
- Regular/Sale Pricing checkboxes ensure the product on your website matches the pricing in your POS system. Best practices are shown below.
- Notifications will email you when there are items trying to map to your site, or if a file hasn't been uploaded or processed for your site in a number of days.
- POS Flags are for users of Microsoft RMS point of sale. Other point-of-sale systems may also be affected if you select these flags.

Multiple Store Locations
If you have multiple locations, a different part of this page will appear.

- Locations you make in Store Information will appear on the left.
- The dropdown menus on the right will have locations as named in your POS.
- Select the location name that matches and save changes at the bottom of the page.
Weekly Maintenance
-
-1.png?width=30&height=30&name=small%20owl%20video%20play%20(30%20x%2030%20px)-1.png) Settings > POS Sync >Process Items: Review pending Mapping and map items. This could be as frequent as daily, depending on how often shipments arrive that may contain new products.
Settings > POS Sync >Process Items: Review pending Mapping and map items. This could be as frequent as daily, depending on how often shipments arrive that may contain new products. -
-1.png?width=30&height=30&name=small%20owl%20video%20play%20(30%20x%2030%20px)-1.png) Settings > POS Sync > Mapping Search: Select ‘Missing SKUs' then select Delete all MPN/GTIN Mismatch / Missing SKU Mappings. These are items that used to be in stock but are no longer included in your file.
Settings > POS Sync > Mapping Search: Select ‘Missing SKUs' then select Delete all MPN/GTIN Mismatch / Missing SKU Mappings. These are items that used to be in stock but are no longer included in your file. -
-1.png?width=30&height=30&name=small%20owl%20video%20play%20(30%20x%2030%20px)-1.png) Inventory > Products > Mapped (POS) = No: Select the Delete Display and review items in your catalog that are not mapped to confirm whether they should remain on your site.
Inventory > Products > Mapped (POS) = No: Select the Delete Display and review items in your catalog that are not mapped to confirm whether they should remain on your site. -
Check the Delete checkbox to remove items no longer needed. Save changes.
-
Any Library item deleted reverts to the Library and can be imported again.
-
Products you created that are deleted cannot be recovered.
-
- Inventory > Products > Display In Catalog = No and Only Items We Added = Yes
- Products you created that are no longer in stock become inactive.
- If you will get more of these items back in stock, leave the item so it can re-activate when POS Sync shares positive balance on hand info.
- Delete any items that you will no longer stock.
Troubleshooting
- If you get a notice that your point of sale has not sent a file, check with your point of sale provider to determine next steps.
- Check our guides for Troubleshooting Pricing and Troubleshooting Products to learn more about getting products to appear, incorrect prices, and more.