Process Online Sales
Prepare online sales (orders) for shipping and in-store pickup.
| Before You Begin | Print Pick Ticket |
| Review for Fraud | Fulfill Products |
| Capture Payment | Complete the Sale |
Before You Begin
- New online sales (orders) are found in Sales > Sales, with an order status of "New".
- The default Sales list view sorts sales by the date & time they are received with the newest on top.
 Online sales are designated in the Sales List with the "Online sale" purple pill.
-
- Click here for more information on the Online Sales List.
- Click anywhere within the sale in the list to enter the sale details.
Review for Fraud
- Carefully review the sale and payment for signs of fraud to determine if you'd like to proceed with fulfilling the order.
- For more information about spotting fraud click here to read our article on Limiting Fraud.
Capture Payment
- Capture the payment within the sale details if manual capture is enabled, by clicking the "Capture" button at the bottom of the sale.

-
- Confirm you want to capture the payment in the confirmation pop-up.

- If automatic payment capture is enabled, confirm the payment is marked as Captured.
 Change Sale Status from New to Being Processed, or the appropriate status for your shop.
-
- If the customer has an account with you, this status change is also visible to the consumer in the sale details section of their account.
Print Pick Ticket (optional)
- I
 f desired, a pick ticket can be printed by clicking "More Actions" in the upper right corner of the sale details and choosing "Print receipt".
- This pick ticket should follow the order from beginning to end.
If Order Export is activated, you can export online sales directly from Workstand into your point-of-sale system.
Fulfill Products
- If the ordered items are in stock in your store, take the pick ticket and retrieve the items.
- Always be prompt about getting items! If you only have one left and you sell it to an in-store customer, your online customer is going to be disappointed.
- If the items in the sale need to be ordered from a supplier, make sure to order the items or add them to the next order you submit.
- Once you have the items that were ordered in hand, mark the products as Fulfilled within the sale details by clicking the "Fulfill products" button.

- For in-store pickup orders, change the quantity and select "Pickup in-store" as the Fulfillment option.

-
- Select a date the item(s) will be ready for pickup, a pickup time if desired, and click "Fulfill items".

- Select a date the item(s) will be ready for pickup, a pickup time if desired, and click "Fulfill items".
-
- The item will now display as Fulfilled within the sale details with a "Ready for pickup" designation and an email will be sent to the consumer.

-
- Change the sale status to "Ready for pickup".
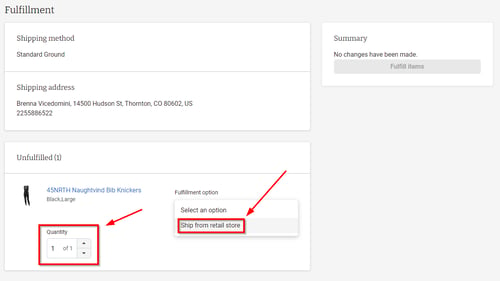
- For shipped orders, pack up the items and attach a shipping label to the box.
- Change the quantity and select "Ship from retail store" as the Fulfillment option.

-
- Enter the tracking number, select the carrier from the drop-down menu, and click "Fulfill items".

-
- The item will now display as Fulfilled within the sale details with a "Shipped with tracking number XXXXXX" designation.

Complete the Sale
- Once the items have been picked up, or delivered to your customer, change the sale status to "Completed".
- Changing the sale status to "completed" will remove it from the default sales list view.
- To view completed sales, adjust the sales list filter to include completed sales.